Happy Valentines day!!!!!!!!!
I’ve been wanting to develop this recipe literally since I started my blog in December 2020, and decided to finally do it for Valentines Day this year! If you aren’t familiar with the To All The Boys I’ve Loved Before Trilogy (I’d highly reccomend), the main character Lara Jean makes these for her boyfriend on Valentines Day in the second movie, and there’s a baking scene and everything.
They are so cute and romantic, but even if they are just for yourself, these are really fun to make. Lara Jean has a way of making baking very aesthetic, which you can see in the clip from the movie here, so whenever I make these I try to be half as cool as her. (Check out my reel based off the baking scene here, how did I do?)
The recipe itself I’ve been developing for a while now, and I added gram measurements too for the first time because they are much more convenient (thanks to my amazing not-in-the-USA online baking friends for inspiring me!) These turnovers have a flaky crust, an amazing cherry filling, and the perfect ratio of the two. They are completely vegan, don’t take much work, and are so fun to assemble. I highly reccomend trying them out!
Check out my Instagram here for more photos and the reel, and have a great Valentines!

Lara Jean’s Cherry Turnovers (vegan!)
Ingredients
For The Dough:
- 2 cups (280 grams) all purpose flour
- ¾ cup (170 grams) cold vegan butter (I use earth balance)
- 1 tbsp (12 grams) sugar
- ½ tsp (2 grams) salt
- 4-5 tbsp (60-70 ml) ice cold water
For The Cherry Filling
- 1 ½ cup (240 grams) frozen pitted dark sweet cherries (heaping)
- ½ cup (110 grams) sugar
- Juice of ½ lemon (~40 grams)
- 2 tbsp (20 grams) cornstarch
- 3 tbsp (45 ml) non-dairy milk, plus more for brushing
Instructions
For The Dough:
- Mix together flour, sugar, and salt in a medium bowl or food processor.
- Cut butter into small cubes/ chunks and use a pastry cutter, your hands, or the food processor to mix in. Break up the butter until the mixture has pea sized or smaller crumbs, and then add in the ice cold water and mix until a dough forms.
- Shape into a ball, cover, and leave in the fridge or freezer for at least 30 minutes, up to a few hours.
For The Cherry Filling:
- While the dough is chilling, place the cherries and sugar in a saucepan over medium/high heat. The cherries can be pretty large, just be sure there aren't any pits.
- While that's heating up, mix together the cornstarch and milk in a small bowl with a fork until completely smooth. Set aside, and add lemon juice to cherries.
- Stir for a while until the the mixture starts to simmer and the cherries cook down, and then mix the cornstarch slurry one more time before slowly adding it.
- Stir well as it thickens, about 1-2 minutes, and then take off the heat, cover, and put in the fridge until completely or almost completely cooled.
Assembly:
- Preheat oven to 350° F or 180° C and roll out cold pie dough on a well floured surface until ¼ cm (or whatever looks right for you) thick.
- Cut out an even number of 4½ by 3 inch rectangles, making sure every one has a pair, and add about 1 tbsp filling onto half of them. Cut 3 slits into the other half.
- Brush around the filling with extra non-dairy milk, so that they come out neat after baking, and place slitted half on top. Seal with a fork, and then use a knife to trim the edges. (See reel on my instagram!)
- Place on a lined baking sheet, brush well with non-dairy milk, and bake for 30-35 minutes.
- Enjoy, and happy Valentines day!!

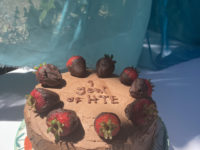
Pingback: Happy 2 years, YVB!! Some photos and a recap: – Yummy Vegan Bakes